Hiển thị các bài đăng có nhãn Backup. Hiển thị tất cả bài đăng

Thứ Hai, 13 tháng 4, 2015

How to Burn Purchased iTunes Movies to DVD Disc?

This tutorial will teach you the simplest solution to remove iTunes DRM and then you can convert iTunes movies to other video or audio file you needed or burn iTunes to a new DVD disc.

“ How to Convert iTunes movies to DVD I have purchased several movies from iTunes. Since most of the times these movies are played on my APPLETV. However from time to time the children want to watch the movies in their room. I can not find any menu option that will allow me to burn purchased movies to a DVD. Please explain how to do this?” 

Hot Search: iTunes to TV, iTunes to WMP, VIDEO_TS to iTunes, iTunes to PS Vita


Many of users would encounter the same problem as Noppie. However, music and movies purchased from iTunes can be only played on Apple products due to DRM (Digital Rights Managements) protection. If you want to view your iTunes purchased movies on your home DVD player, you will have to remove iTunes DRM first and then you are able to burn iTunes movies to DVD. So, What's the best way to burn movies from iTunes? You'll find all the solutions here. Here two programs are recommended to copy iTunes movies to DVD with customized DVD menus:

A: Burn iTunes Movies to DVD with Pavtube ChewTune
B: Burn Movies from iTunes to DVD with Pavtube DVD Creator
    
Part One: Convert DRM-protected iTunes Video to DVD for Playback

Pavtube ChewTune has been recognized as the most powerful iTunes DRM Removal Software which lets you remove DRM protection from iTunes to DVD easily. Highly recommended and you will be amazed at how it works. Read the Review. This is a top iTunes DRM removal tool which get iTunes to DVD conversion fully supported by removing DRM from M4V and burning DVD at one place. It also preserves the original quality of M4V video. The software has a very easy to use and simple user interface so that it can be easily used by a novice and a professional user. 
  
The steps that you need to follow to remove DRM protection from both iTunes rentals and purchases and output all kinds of formats or iTunes compatible format using this software are as followed. Note that the Mac version is Pavtube ChewTune for Mac. 

Step-by-step guide: convert iTunes DRMed videos to DVD

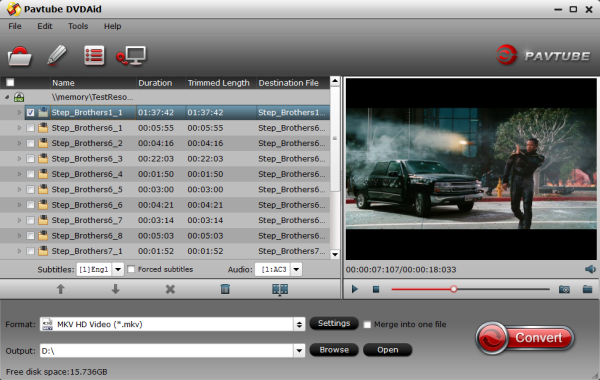
Step 1: Launch the Pavtube DRM removal tool and converter and click “Add Video” to load the iTunes video files to the program for converting. You can also simply drag and drop media files to the source pane to add. Batch conversion is supported so that you can add multiple files.


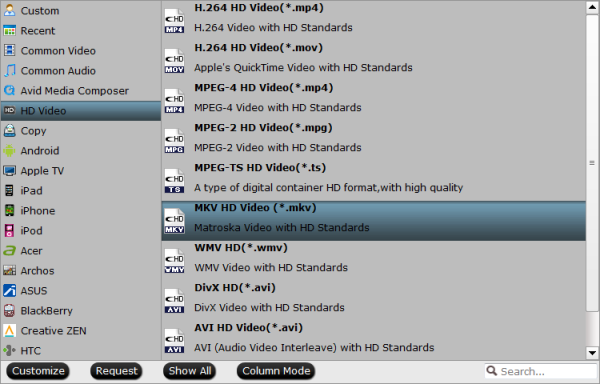
Step 2: Choose the output format for iTunes. For example, choose MP4 as the output format. 


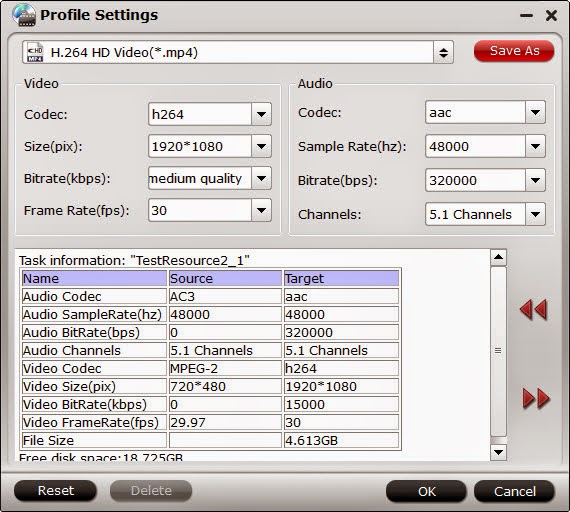
Step 3. Adjust video specs (optional). Click "Settings" button to enter Profile Settings window, you can adjust video size, codec, bitrate and frame rate and some other audio parameters here.

Step 4: Start conversion. You can click the round icon "Convert" to start removing DRM of iTunes videos. 

Part II: How to Burning DRM-free iTunes Videos to a new DVD? 
  
Here I suggest you can get this: Money Saving Software Bundles are coming and it will provide big special sale on much software bundled like: DVDAid($35) + DVD Creator($35) = Only $35.9, Save $34.1. 
  
Pavtube DVD Creator features: It lets you burn any kind of video sources to playable DVD. With its simple wizard-style user interface and powerful editing features, DVD authoring and burning can’t be easier. Almost any kind of fair videos (MKV, AVI, MP4, WMV, MOV, MTS, TiVo, etc) can be imported and converted to DVD video. Photos can be made into slide show DVD simply with a few clicks. In addition, the Quick Burn feature enables users to burn archived ISO image and DVD-Video structure instantly. 

After read this guide, you will have no issues on iTunes purchased movies playback issues, enjoy your time! 

If you have many other videos to deal with, it is the right place for you. Just go to find your favorite:

Thứ Tư, 25 tháng 3, 2015

Convert ISO files to MKV in both English and Hebrew audio

Want to rip ISO images to MKV with English and Hebrew audio, let’s talk about ISO to MKV Converter and how to keep both audio at first.

Q: “ I want to transfer it to HD MKV movies, but can not find the way so i can have it in different audio ( english and hebrew) and also to have few subtitles ( hebrew and english)  is there a way to do it ? i can not mark more then one in the program, and when i mark Hebrew for subtitles, i can not even play it without subtitles...”
  
Nowadays many folks like backing up their DVD discs into ISO image files for managing their DVD movie in an easy way. ISO images are stored in an uncompressed format. If you’re intend to put and play the ISO files with english and hebrew audio. It’s impossible.  you need to do some work in advance.


In fact, with the right program, you can get all done easily and quickly. I recommend you Pavtube Bytecopy, which is special designed for users to rip Blu-ray/DVD ISO files to MKV with multiple audio tracks(english and hebrew). Moreover, it's also a professional Blu-ray/DVD ripper, allows you to rip and convert Blu-ray/DVD discs to any video format you like. Intimate is, there are many optimized presets for tablet and smartphone, including Kindle Fire HDX, Google Nexus 7/Nexus 10/Nexus 4, Galaxy S6/S6 Edge, Galaxy Tab 4, iPad Air 2, iPhone 6 Plus etc. which will give you best video quality.
  
Note: If you are a Mac user, you can turn to ByteCopy for Mac. Now get the right version and follow the below guide to finish converting ISO to MKV with english and Hebrew audio. 

Easy Solution to Convert ISO files to MKV in both english and hebrew audio 
  
Step 1. Free download the best Blu-ray/DVD ISO to multi-track MKV converter, install and launch it. Click "Load disc" button to import my source movie from disc drive. 


Step 2. Choose "Lossless/encoded multi-track MKV (* mkv)" from "Multi-track Video" under "Format" as output format. The profile exports Blu-ray/DVD ISO to MKV with more than one audio track.


Step 3. 4. Adjust profile settings to save both English and Hebrew audio tracks. Click the “Settings” button next to Format Tab, switch to “Audio” option and unchck other audio tracks and only leave English and Hebrew audio, and save your settings. 


Step 4. Then hit the big "Convert" button on ByteCopy main UI and rip ISO movies to multi-track MKV with english and hebrew audios. Once it finishes, open output folder and get the created multi-track MKV movie for watching on both TV and tablet. 

Read More:

Thứ Hai, 9 tháng 2, 2015

Copy/Convert DreamWorks DVD movies for watching effortlessly

Are you searching high and low for a way to rip, convert and copy your DreamWorks DVD collection for easier store or playback? If so, get the quick fix from this article.

For most movies fans, DreamWorks Animation may be quite familiar since it is a world-famous animation studio that creating a bunch of animated feature films, television programs, and online virtual worlds.

However, when it comes to watching latest DreamWorks movies in theater, you may inevitably miss some of your favorite ones. Then you will choose to buy some DreamWorks DVDs like How to Train Your Dragon 2, Rise of the Guardians, Shrek Forever After, etc. for watching to make up for this pity.

Copy/Convert Disney DVD movies for watching

In this case, most people are troubled by finding out the needed DreamWorks DVD in time from a pile of DVDs. On one hand, DreamWorks DVD collection takes so much space that it is difficult store. On the other hand, it needs DVD drive or DVD player to play DVD videos. If you want to enjoy recent DVDs on tablet, you have to backup these DVDs to hard drive first.

Try some freeware to do this job but get disappointed? Since as you know, DreamWorks DVDs is copy protected, which most DVD ripping tools can't deal with. For example, the freeware like Handbrake and Freemake Video Converter can only deal with the non-protected DVDs and DVD Decrypter, like DVD Shrink, although can decrypt protected DVDs, but they upgrade very slowly and can do nothing about the latest released DVDs. Also even some paid DVD ripping programs can't successfully finish this task.

What you need is a more professional DVD ripping tool. Unlike the free DVD transcoder software, Pavtube DVDAid is an intelligent DVD copy and ripping tool that is very easy to use. It has already successfully ripped several new released DreamWorks DVD movies to decent format MP4 I need and other formats like MKV, AVI, WMV, MOV, M4V, FLV, etc. Also the converted DVD quality is quite satisfactory; you even cannot notice the difference between the original DVD and the ripped version. If you are Mac users, please turn to DVDAid for Mac. Now download the right version and start the conversion.

How to convert DreamWorks DVD movies to video/audio files

Step 1> Import DreamWorks DVD movie

Insert the DreamWorks DVD disc into your computer's hard drive and run the DreamWorks DVD Ripper. Then click "Load DVD" and import your DVD movies. You can also add DVD folders, ISO image files or IFO files to rip.


DVD to Plex Ripper

Step 2> Choose output format

Click "Format" bar and select the output video/audio format you like. You can either choose MP4, MOV, AVI, WMV, etc. as the output format.


Plex Media Server video format

Tip: If you can also select the icon of a device/software to get videos with optimized settings for a certain device/software like iPhone, iPad, iPod, Samsung, PS3, etc.

Step 3> Start ripping DreamWorks DVD

Click "Convert" button to start the DreamWorks DVD ripping process. After the conversion completes, you can click "Open" to get the ripped media files. After that, you can enjoy DreamWorks movies anywhere you want them.

Tips: If you want to 1:1 copy DreamWorks DVD to hard drive without anything loss, please go to the way backing up DVD in Video_ts folder.

More related:  

Thứ Sáu, 6 tháng 2, 2015

Backup 2015 Oscar Video from YouTube for watching on mobile devices

Here is a guide of how to backup movies performed by 2015 Oscar film Winners and Nominees from YouTube for watching on mobile devices for watching at free will.

The nominees of the 87th Academy Awards were announced on Jan,15th, one month earlier than the final ceremony which will be launched on February 22, 2015 at the Dolby Theatre in Hollywood, Los Angeles. Although the final ceremony of the 87th Oscars is still a while to go, audiences are able to enjoy those nominees they've missed from various online channels, like YouTube.

Backup 2015 Oscar Video from YouTube

All the 2015 Oscar awarded and nominated films from YouTube are worth collecting, if you have downloaded some of the YouTube movies onto computer with a YouTube Downloaders, it is a great way to copy them onto mobile devices, then you can watch them anytime anywhere you like on the go.

Obviously to backup 2015 Oscar YouTube Movie to mobile devices for future watching with your family, you need a third-party software at first. Well, masses of tools like Xilisoft Video Converter Ultimate, Handbrake can be found on the Internet that makes it reasonably easy to convert 2015 Oscar Video from YouTube for storage. But you know, not all the tools are good enough and with no quality loss.

Here the best one I tried is Pavtube Video Converter Ultimate which can do us such a favor in converting 2015 Oscar YouTube Video to AVI, MP4, MPEG(2), MOV, WMV, FLV, ISO image, or other digital video files for watching 86th Academy Awards Best Pictures on Apple TV, iPhone 6/6 Plus, iPad Air 2/mini 3, Android, iPod Touch, Samsung Galaxy S3/S4/S5, Note 4/Edge/3, Kindle Fire HD, Xbox, PSP, and so on. Plus, you can edit video to get clips of your favorite scenes from a movie before conversion. Mac vesion is here. In this article, I'll show the best way to backup 2015 Oscar Video from YouTube for watching on mobile within four simple steps.

How to convert downloaded 2015 Oscar YouTube Video to mobile devices with Ease

Step 1: Import FLV files from YouTube.

Launch the best mobile YouTube Converter. Click the button “Add Video” to add YouTube video files. If it is necessary, you can double click the each file to have a preview.

Tip:
If you have several video files, and wanna combine video files for mobile devices, you just need to tick off the “Merge into one” box.

Step 2: Select an output format and set the output folder.

Click on the dropdown menu of “Format” and then move your pointer to “Common Video” and choose “H.264 HD Video(*.mp4)”, “MPEG-4 HD Video(*.mp4)” are compatible format. And then you can set the output folder.


Step 3: Click “Settings” icon to adjust audio and video parameters for mobile devices.

Click the “Settings” icon and you will go into a new interface named “Profile Settings”. You can adjust codec, bit rate, frame rate, sample rate and audio channel in the interface according to your needs and optimize the output file quality.

Step 4: Start converting your 2015 Oscar YouTube flv videos to mobile MP4.

Click the “Convert” button; it will convert 2015 Oscar videos from YouTube to MP4 for mobile devices immediately. Once the conversion is done, you will be able to get the output files via clicking on “Open” button effortlessly.

Tips:

If you wanna convert 2015 Oscar Video from YouTub to audio files, iTunes, Windows Media Player, Video Converter Ultimate is also of great help. Why do you still hesitate? Download and begin the enjoyment now! As you see, watching YouTube video on mobile devices without limitation is quite a piece of cake!

More related: 


Thứ Tư, 4 tháng 2, 2015

Copy Blu-ray/DVD movies to Seagate Wireless Plus for widely sharing wirelessly

This article shows you an easy way rip and convert Blu-ray/DVD to Seagate Wireless Plus supported video for widely sharing wirelessly on a trip.

Forget about having to choose which files to load onto your tablet or smartphone before a trip. Bring a Seagate Wireless Plus all with you! Wireless Plus has enough built-in storage like the 2TB one can load up to 500 movies or thousands of songs, photos and documents. Wanna adding your large Blu-ray/DVD collection to Seagate Wireless Plus for enjoying on trip with your family? Now learn the step-by-step guide on the way to realize.


adding Blu-ray/DVD collection to Seagate Wireless Plus

Since Seagate Wireless Plus can not meet the demands of put Blu-ray/DVD discs online, to save Blu-ray and DVD on Wireless Plus for convenient access, you need to convert and rip Blu-ray/DVD to Seagate Wireless Plus supported video files at first.

Software Requirement:

Pavtube ByteCopy or ByteCopy for Mac is such a wise choice for you. With it, you can not only rip and convert Blu-ray/DVD to Seagate Wireless Plus with super fast conversion speed and excellent image and sound quality, but also easily backup your Blu-ray and DVD disc with whole content copy or backup main movie. Best of all, you can lossless copy your discs in mkv for storage with multiple audio tracks keeping. (Read comparison review: ByteCopy & MakeMKV) Let's have a closer look at the basic steps.

How to rip and copy Blu-ray/DVDs to Seagate Wireless Plus friendly video

Step 1: Load Blu-ray/DVD movies

Run the Blu-ray/DVD to Wireless Plus Ripping program and click “BD/DVD disc” icon to load Blu-ray/DVD movies for converting. You can also import movies files from Blu-ray/DVD folder or ISO image files.

Blu-ray/DVD to Wireless Plus Ripping program

Tip: Highlight the movie title you want to rip, and then you can click the dropdown menu after “Subtitles” and “Audio” respectively to select your wanted subs and audio track to be preserved in the resulted files.

Step 2: Choose output format

As Seagate Wireless Plus is powerful enough to almost all kinds of formats, you can choose the format according to your own needs like MP4, MOV, AVI, MKV, etc. If you would like to enjoy movies from physical discs to your mobile phone and tablet, you can select a decent format like "iPad > iPad HD Video(*.mp4)" from the profile list comes with the software.

Seagate Wireless Plus supported format

Tip: Click Settings bar, you can adjust the level of compression to suit the quality you want.


Note: If you prefer a much better video quality and don’t mind the output file size, you can rise the video bit rate higher. Generally speaking, the higher video bit rate will result in the larger output file size, and vice versa.

Step 3: Rip Blu-ray/DVD to Seagate Wireless Plus

Finally, click "Convert" button to rip/convert Blu-ray/DVDs to optimized format for Seagate Wireless Plus. When the conversion finishes, click Open button to find the output files and you can do the online movie sharing via your Seagate Wireless Plus on iPad with family members and friends. Also you can stream your video onto any smart TV or devices in the house using Seagate.

More related:


Thứ Hai, 2 tháng 2, 2015

How to Copy and Rip DVD to Plex Media Server for Streaming

This article mainly shows you an easy way to rip and store DVD on Plex Media Sever for free streaming, playing and sharing with your TV and mobile devices freely.

Plex is designed to organize all of your personal media so you can enjoy your movies freely on  TV, iPad, computer or phones both home and away. Have have a diverse library of DVD movies? What if we want to store DVD on Plex Media Server? No worry, the article will focus on how to rip DVD to Plex Media Sever for playing and streaming. 


store DVD on Plex Media Server
  
To get your DVD collection to Plexwhat you need to do is to convert your DVD movie library to Plex Media Server friendly format at first. There’s all kinds of different DVD ripping software out there (some free, some not) with a variety of different options. It seems a bit overwhelming. Well, more than one guys recommend Pavtube DVDAid, which can help us finish DVD conversion bypassing DVD copy protection.

With it, we can convert DVD to Plex Media Server with MP4 format (the most compatible video format for Plex Media Server) without quality loss. Plus, it also allows users to copy DVD to hard drive with original structure or main movie only. Best of all, with its built-in video editor, you can personalize and retouch your videos in clicks. For Mac users, DVDAid for Mac will be a helpful app.


How to Backup and Rip DVD to Plex Media Sever

1. Add DVD movies

Install and launch DVD Ripper program, and then click the disc icon to import your source movies to this program. Set your wanted subtitles and audio track from the drop-down box of “Subtitles” and “Audio” tab.

DVD to Plex Ripper

2. Select an output format

Click the “Format” option, and choose HD Video > MKV HD Video(*.mkv) as output format. You can also select H.264 HD Video (*.mp4) for Plex Media Server.

Or backup DVD with Main Title only and original structure for storage.

Plex Media Server video format

Tip: If you like, you can click “Settings” to change the video encoder, resolution, frame rate, etc. as you wish. Keep in mind the file size and video quality is based more on bitrate than resolution which means bitrate higher results in big file size, and lower visible quality loss, and vice versa.

Plex Media Server video settings

3. Start ripping DVD for Plex Media Sever

Click the "Convert" button under the preview window, and the DVD ripper will start the conversion from DVD movies to MKV or MP4 for Plex Media Sever. After conversion, you can stream DVD movies through Plex Media Server to HDTV or iPad, Galaxy Tab, or other DLNA-compliant devices.

More related:


Thứ Tư, 28 tháng 1, 2015

Backup Blu-ray Collection into Synology DiskStation DS215j readable video

Read this article and you will quickly learn how to backup and convert Blu-ray movies to Synology DiskStation DS215j friendly video for streaming.

As a devoted owner of a collection of Blu-ray discs, you would love to share some awesome movies with your friends or family, or watch movies in your smart phone while traveling. And of course you don’t want to break them if you use them many times. So that may be a dream to put all your Blu-ray in a NAS like Synology DiskStation DS215j with 6TB. (Have a 3TB external network drive? The Blu-ray backing up is just a piece of cake!)

Backup Blu-ray Collection to Synology DiskStation DS215j

With a Synology Ds215j, your Blu-ray movies can be accessible from any device from anywhere or displayed on TV at home via network. Then how to realize your dream?

In fact, to backup a Blu-ray disc to Synology DiskStation, a powerful third-party software for backing up Blu-ray is surely needed at first. Here Pavtube BDMagic is the best Blu-ray to NAS Ripper (Read the top Blu-ray Rippers review) that can output Synology DiskStation and multimedia players readable formats such as .mp4, .mov, .m4v, .mkv for storage from Blu-ray with ease. Meanwhile, you can freely select the desired subtitle and audio. And the most important thing is that by using NVIDIA CUDA technology or AMD APP tech, the conversion speed can be even faster than before. Mac version is here. Here are simple 3 steps  for you to do the backup.

3 Steps to Rip and Copy Blu-ray to Synology DiskStation DS215j

Step 1. Import Blu-ray files

Download Pavtube BDMagic and run it. Import a Blu-ray folder or Blu-ray ISO file you have. (Learn how to keep DVD chapter markers when copying)

Blu-ray To Synology DiskStation Converter

Step 2. Choose an output format

Move your mouse cursors down and see “Format” box. Yeah, don’t hesitate, just click it and you  can choose Synology DiskStation DS215j best supported mp4 format which is also playable on your media devices, or you can select the corresponding format for iPad, iPhone, PS3, Apple TV, etc. for easily streaming.

Synology DiskStation Supported Formats

Tip: If you want to output smaller size and save space in your DS215j, you can adjust “Bitrate”in “Settings”by choosing a smaller bitrate.


Step 3. Start to copy Blu-ray to Synology DiskStation

Press “Convert” and now it will start your Blu-ray copying with lossless quality. After you finish ripping your Blu-ray to Synology DiskStation DS215j, click “Open” button down to find your output file.

Now what you need to do is to connect the Synology DiskStation to PC and stream videos from Synology DS215j to iPad, iPhone, Apple TV, PS3, or other media players for enjoying anywhere! Note that you need to make sure the wireless network is accessible between your Synology DiskStation and the media player. So easy! Isn't it?

Thứ Hai, 22 tháng 12, 2014

Rip Blu-ray title to AVI format for playing on any modern portable media player

This tutorial is about how to use Pavtube BDMagic to convert Blu-ray title to AVI for playback with specific modern portable media player. Please follow me step by step.
 
In the past, if you want to preserve your hundreds of Blu-ray discs, it may take you the space of a whole shelf. Now to clean up your Blu-ray collection and get them freely playback on any modern portable media player, ripping Blu-ray to AVI format should be the right thing to do. So today I am here to give you guys the one-stop solution to convert Blu-ray to AVI with original video quality.
convert Blu-ray to avi

For those who would like to realize the ripping process, Pavtube BDMagic will be your best option. (Here is review) It enables you to remove Blu-ray protections and then rip Blu ray to AVI format, which is playable on majority of PC media players, with keeping most razor-sharp image. Besides AVI, users may use it to convert their Blu-ray to other formats like MP4/MOV/MKV/WMV/MPEG, and to play on other devices as well.

Now I will show you the full guide on how to convert Blu-ray to AVI with High Quality and Fast Speed. Check out. 

Tutorial: How to Rip Blu-ray to AVI for playing on any modern portable media player

Step 1: Load Blu-ray Movies

Install and run the ideal Blu-ray to AVI Converter(For Mac users, BDMagic for Mac will do a great job). Simply click the "Load BD" button on program toolbar to load Blu-ray movies from disc or computer. All imported Blu-ray movies could be previewed on program right viewing window. 

Blu-ray to AVI Converter

Tip: All titles of the original Blu-ray movies could be seen on program left panel. And in every title, you can see various chapters. Just check the titles or chapters you want to rip.

Step 2: Choose Desired Subtitles for Output 

To convert Blu-ray movies to AVI with subtitles contained, just simply click “Subtitles” and select the one you prefer.

Tip: You can also choose to rip Blu-ray with forced subtitles if you don’t want to have extra subtitles on screen for your native language.

Step 3: Select AVI output format
Select “DivX AVI - Audio Video Interleaved(DivX)(*.avi)” as output format from “Common Video” category under the drop-down list of “Format”. If you want to get better HD video quality, choose “AVI HD Video(*.avi)” from “HD Video” category as the output format for playback on any modern portable media player.

  avi video format

Step 4: Start ripping Blu-ray to AVI

As all settings are done, you can click bottom-right button "Convert" to start converting Blu-ray to AVI. The time that it takes Depends on your source movie quality and Movie Length. And thanks to its built in Nvidia CUDA and ATI stream accelerate technology. Makes the conversion speed at least 6X faster than common conversions. 

When the task is done, click “Open” button to find the result movie file. Then, you can grab a top AVI player and view Blu-ray titles in modern portable media playersOf course, the lossless quality is ensured on output files. In addition to Blu-ray playback, you can also get Blu-ray for editing in your Premiere Pro freely. 

Thứ Sáu, 12 tháng 12, 2014

Convert PAL DVD to MP4 NTSC DVD for freely Playback or Burning

Below tutorial guides you to rip and convert PAL DVD to MP4, MOV, AVI, MKV for playback and to NTSC video for later DVD burning.

When do you need to convert your DVD video from PAL to NTSC?

The answer is simple: when you want people overseas to watch your DVD. It’s not a secret that different countries use different analog television encoding standards. So when you plan to let your friends play a European or Chinese commercial PAL DVD on their American NTSC player, they may be unable to successfully watch it on their DVD players. 
Convert PAL DVD to MP4 NTSC DVD

To resolve the incompatibility problem of NTSC and PAL formats, you will need software which will allow you to convert PAL DVD to MP4 NTSC DVD. Pavtube BDMagic offers just what you are looking for!
  • Review: Best Software for ripping Blu-ray on Windows and Mac
This convenient PAL to NTSC Converter will allow you to turn PAL DVD to region free and rip PAL DVD to MP4, MOV, AVI, MKV, etc. so as to be compatible with all the media players. With this PAL DVD ripper in hand, you can play your PAL DVD anywhere anytime without worrying any incompatibility issue. What's more, you can also convert your PAL DVD to NTSC format video for burning into a blank DVD. The mac verion is BDMagic for Mac.

Part I: How to Rip and Convert PAL DVD to MP4 AVI MKV MOV

1. Import PAL DVD

Install and run the PAL DVD ripper. Insert the DVD disc into your computer drive and then load DVD files that you want to convert to the program.

PAL DVD ripper

2. Specify an output format

Click the Format bar to choose an output format. Usually, popular format like WMV, AVI, MP4 can be play smoothly in Windows. So, choose these format from Common Video profile list.

MP4 video format

Tip: Each format parameters can be customized. You can adjust them as per needs or just keep the original settings.

3. Start PAL DVD conversion

When all settings are done, click the Convert button to start the ripping process. After the PAL DVD ripping procedure is over, you can finally enjoy PAL DVD movies on any country you like. 
  • Read more DVD and Blu-ray ripping tips here.
What's more, here is another workaround to play PAL DVD on computer:

1. Click the "Start" button on the desktop, then right-click "(My) Computer" and select "Properties" from the pull-down menu.
2. Choose "Hardware," then "Device Manager." This loads a window with all the hardware installed on the computer system.
3. Choose the "DVD" option, then right-click the DVD and select "Properties."
4. Click the "DVD Region" setting. This brings up the DVD region change option window. 
5. Determine the region of your PAL DVD. A PAL DVD from Europe and South Africa is Region 2, while India is Region 5, China is Region 6, South East Asia (Thailand, Indonesia, Malaysia and Singapore) is Region 3 and Australia is Region 4.
6. Select the PAL region on the computer settings and click "Apply" to accept the changes. 

Note: You can change the region only five times. Besides, for those who wanna play and share PAL DVD anywhere freely, we still recommend the first solution.

Part II: How to Rip and Convert PAL DVD to NTSC DVD 100% Quality Reserved

1. Insert DVD in your computer DVD-ROM, click the DVD disc button to import your DVD movies. 

2. Click “Format” bar, choose “VOB Format” > “DVD-Video Format - NTSC(*.vob)” from the Format menu to copy the . vob files from your PAL DVD.


3. After that, do remember clicking “Convert” button to do PAL DVD video to NTSC conversion on Mac. After a few minutes, you can garner your desired NTSC DVD video and burn it to your blank NTSC DVD disc for storage. You’re done.
Tip: To burn your PAL or NTSC videos to DVD right after conversion, you can use Pavtube DVD Creator. And this comprehensive software BDMagic + DVD Creator package will help you to save more money.